Introduction
Extensions is a way to extend Specter Desktop in a way which does not need PRs in the core-project. They can be used to - create elaborated Frontends on top of Specter Desktop or even replace the whole Frontend - Add Additional Menu Items currently in Wallets and Settings - Create additional Devices with the functionality you would like to have
We currently rework the naming of extensions/plugins/services. If not otherwise stated, for now, they are used interchangeably
TL;DR
You can create an extension with an up to date Specter Desktop instance. Assuming that we're creating an extension called rubberduck, it's as simple as this:
$ mkdir /tmp/rubberduck && cd /tmp/rubberduck
$ virtualenv --python=python3 .env
$ . ./.env/bin/activate
$ pip3 install cryptoadvance.specter --upgrade
$ python3 -m cryptoadvance.specter ext gen
We need an id and a prefix for your extension.
The id should be a short string.
The prefix is usually your GitHub username
or GitHub organisation name.
Both will be used to to create a directory structure like this:
./src/mycorpname/specterext/myextension
They will also be used when publishing this extension to pypi.
Enter the id of your extension (lowercase only): rubberduck
Enter the prefix: mynym
Note: Isolated client mode means that the extensions won't share the session cookie with
Specter Desktop and the integration only happens on the server side.
Should the extension work in isolated client mode (y/n)?: n
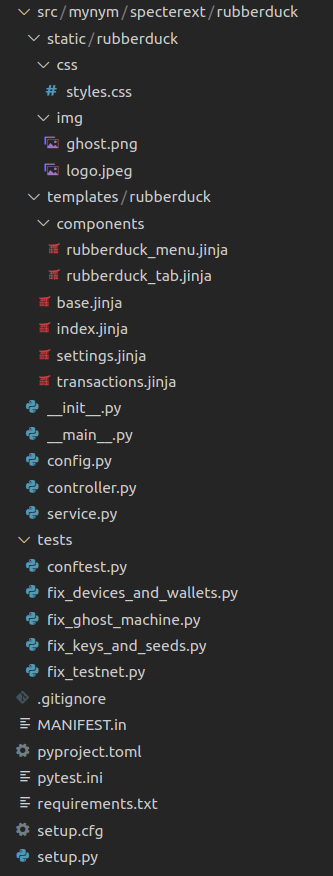
--> Created requirements.txt
--> Created .gitignore
--> Created src/mynym/specterext/rubberduck/service.py
--> Created src/mynym/specterext/rubberduck/controller.py
--> Created src/mynym/specterext/rubberduck/config.py
--> Created src/mynym/specterext/rubberduck/__init__.py
--> Created src/mynym/specterext/rubberduck/__main__.py
--> Created src/mynym/specterext/rubberduck/templates/rubberduck/index.jinja
--> Created src/mynym/specterext/rubberduck/static/rubberduck/css/styles.css
--> Created src/mynym/specterext/rubberduck/static/rubberduck/img/ghost.png (via Github)
--> Created src/mynym/specterext/rubberduck/static/rubberduck/img/logo.jpeg (via Github)
--> Created src/mynym/specterext/rubberduck/templates/rubberduck/base.jinja
--> Created src/mynym/specterext/rubberduck/templates/rubberduck/transactions.jinja
--> Created src/mynym/specterext/rubberduck/templates/rubberduck/settings.jinja
--> Created src/mynym/specterext/rubberduck/templates/rubberduck/components/rubberduck_menu.jinja
--> Created src/mynym/specterext/rubberduck/templates/rubberduck/components/rubberduck_tab.jinja
--> Created pytest.ini
--> Created tests/conftest.py
--> Created tests/fix_ghost_machine.py
--> Created tests/fix_devices_and_wallets.py
--> Created tests/fix_testnet.py
--> Created tests/fix_keys_and_seeds.py
--> Created pyproject.toml
--> Created setup.py
--> Created setup.cfg
--> Created MANIFEST.in
Congratulations, you've created a new extension!
Here is how to get it to run in your development environment:
pip3 install -e .
python3 -m cryptoadvance.specter server --config DevelopmentConfig --debug
# Point your browser to http://localhost:25441
# Click "Choose plugins" --> rubberduck
If you want to package it, you can build it like this:
python3 -m pip install --upgrade build
python3 -m build
# Install it like this:
pip3 install dist/mynym_rubberduck-0.0.1-py3-none-any.whl
If you want to bring your extension to production, please refer to
the readme in the dummy-extension repo:
https://github.com/cryptoadvance/specterext-dummy#how-to-get-this-to-production
To publish your package
python3 -m pip install --upgrade twine
python3 -m twine upload --repository testpypi dist/*
You can get all this information again via:
python3 -m cryptoadvance.specter ext gen --help
$
The created file structure looks like this and you will feel right at home if you have some knowledge about how Flask works:
Virtualenv Management
Often enough, extension development goes hand in hand with the development of Specter Desktop iteself. Especially in the very beginning you need to constantly develop on the extension-concept on Specter Desktop while also using/consuming that functionality in an extension.
In such a case, the current best option is to "reuse" the virtualenv of Specter Desktop also for your extension. Other than what is described above, you would do something like the below. If you have checked out the Specter Desktop Code in parallel with the extension-code, you would ommit the creation of the virtualenv above and rather activate the existing one in your Specter Desktop Development Directory:
. ../specter-desktop/.env/bin/activate
pip3 install -e .
python3 -m cryptoadvance.specter server --config DevelopmentConfig --debug
Another, maybe even better option, would be to not reuse the Virtual Environment from specter-desktop to install the extension in editable mode, but to do it the other way around: Installing specter-desktop in editable mode in the virtualenv of the extension. However, that needs to be tested.
More information about the development of Specter Desktop can be found here.
Concept
As much as possible, each extension should be entirely self-contained with little or no custom code altering core Specter functionality. There is a name for that: Extension framework.
The term extension will be used for all sorts of extensions whereas plugin will be used as a component which can be de-/activated by a user.
All extensions are completely separated in a specific folder structure. There are internal extensions which SHOULD be located in cryptoadvance.specterext.id_of_extension but at least 2 extensions are still at the deprecated location of cryptoadvance.specter.services. However, that does not mean that an extension needs to be located in the same repository as Specter itself. Extensions can be located in their own repository even if they are incorporated into the official Specter release.
Independent of whether an extension is shipped with the official Specter-release binaries and whether it's an internal (which is shipped) or external extension (which might be shipped), the creation of extensions is already heavily supported and encouraged.
Whether an extension is shipped with the official binary is ultimately a choice of the Specter team. However, you can simply develop extensions and use them on production (only for technical personel) as described in specterext-dummy (see below).
A description of how to create your own extension can be found above.
All the attributes of an extension are currently (json support is planned) defined as attributes of a class which is derived from the class Service (should be renamed). That class has attributes which are essential. So let's discuss them briefly.
Extension attributes
Here is an example. This class definition MUST be stored in a file called "service.py" within a package with the name mynym.specterext.myextensionid. You don't have to create such files yourself. Please always use the extension generation procedure to create your extension.
class MyextensionidService(Service):
    id = "myextensionid"
    name = "A Nice name for my Extension"
    icon = "myextensionid/myextensionid_logo.png"
    logo = "myextensionid/myextensionid_logo.png"
    desc = "A nice description"
    has_blueprint = True
    blueprint_module = "mynym.specterext.myextensionid.controller"
    isolated_client = False
    devices = ["mynym.specterext.myextensionid.devices.mydevice"]
    devstatus = devstatus_alpha
This defines the base Service class (to be renamed to "Extension") that all extensions must inherit from. This also enables extension auto-discovery. Any feature that is common to most or all Service integrations should be implemented here.
With inheriting from Service you get some useful methods explained later.
The id needs to be unique within a specific Specter instance where this extension is part of. The name is the display name as shown to the user in the plugin-area (currently there is not yet a technical difference between extensions and plugins). The icon will be used where labels are used to be diplayed if this extension is reserving addresses. The logo and the description is also used in the plugin area ("choose plugins").
If the extension has a UI (currently all of them have one), has_blueprint is True. The blueprint_module is referencing the controller module where endpoints are defined. It's recommended to follow the format org-id.specterext.myextensionid.controller.
isolated_client should not be used yet. It is determining where in the url-path tree the blueprint will be mounted. This might have an impact on whether the extension's frontend client has access to the cookie used in Specter. Check config.py for details.
In devices, you can specify the modules where you're implementing new Devices.
devstatus is one of devstatus_alpha, devstatus_beta or devstatus_prod defined in cryptoadvance.specter.services.service. Each Specter instance will have a config variable called SERVICES_DEVSTATUS_THRESHOLD (prod in Production and alpha in Development) and depending on that, the plugin will be available to the user.
Address-Level Integration
An Address can be associated with an Extension (e.g. addr X received a smash buy from Service Foo) via the Address.service_id field.
An Extension can also "reserve" an Address for future use by setting Address.service_id. The normal "Receive" UI will automatically skip any reserved Address when generating a new receive address. The reserved addresses are interleaved with ready-to-use addresses so that we don't create any potentially confusing wallet gaps (e.g. addrs 4, 6, and 8 are reserved but addrs 3, 5, and 7 are available).
Users can also manually associate an existing Address with a Service (this is useful when the user has info that the particular Service api can't provide for whatever reason).
Note: TODO: manually un-reserve an Address from a Service.